
Strawberry Group | Topic Two, Byte Part
T2, Byte Part ( 1 )
SELECTING INSTALLATION MEDIA
Red Hat provides several installation media that you can download from Customer Portal.
A binary DVD containing Anaconda, the Red Hat Enterprise Linux installation program, and the BaseOS and AppStream package repositories. These repositories contain the packages needed to complete the installation without additional material.
A boot ISO containing Anaconda but requires a configured network to access package repositories made available using HTTP, FTP, or NFS.
A QCOW2 image containing a prebuilt system disk ready to deploy as a virtual machine in cloud or enterprise virtual environments. QCOW2 (QEMU Copy on Write) is the standard image format used by Red Hat.
Building Images with Composer
The composer uses the Cockpit graphical web console. It can also be invoked from a command line using the composer-cli command.
Note: composer-cli
ব্যবহারের ক্ষেত্র:
- Custom RHEL VM ইমেজ তৈরি
- Automation মাধ্যমে image pipeline চালানো
- Minimal বা hardened RHEL ইমেজ তৈরি
MANUAL INSTALLATION WITH ANACONDA
Using the binary DVD or boot ISO, administrators can install a new RHEL system on a bare-metal server or a virtual machine. The Anaconda program supports two installation methods:
The manual installation interacts with the user to query how Anaconda should install and configure the system.
The automated installation uses a Kickstart file.
Installing RHEL with the Graphical Interface
Anaconda presents the Installation Summary window,
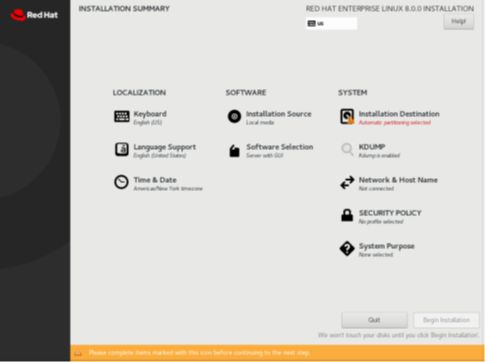
Anaconda marks mandatory items with a triangle warning symbol and message. The orange status bar at the bottom of the screen reminds you that mandatory items remain to be completed before the installation can begin.
KDUMP – Kdump is a kernel feature that collects system memory contents when the kernel crashes. Red Hat engineers can analyze a kdump to identify the cause of a crash. Use this Anaconda item to enable or disable Kdump.
SECURITY POLICY – By activating a security policy profile, such as the Payment Card Industry Data Security Standard (PCI DSS) profile, Anaconda applies restrictions and recommendations, defined by the selected profile, during installation.
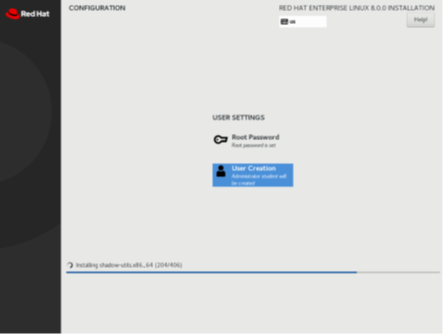
Root Password – The installation program prompts to set a root password. The final stage of the installation process will not continue until you define a root password.
User Creation – Create an optional non-root account. Maintaining a local, general use account is a recommended practice.
Click Reboot when the installation is done. Anaconda displays the Initial Setup screen, if a graphical desktop was installed.
Note:
- Rhel installer name is anaconda
- KDUMP
- Security Policy
Troubleshooting the Installation
RHEL 8 ইনস্টলেশনের সময় Anaconda দুইটি ভার্চুয়াল কনসোল প্রদান করে:
প্রথম কনসোল (Ctrl+Alt+F1):
এখানে tmux টার্মিনাল মাল্টিপ্লেক্সার ব্যবহৃত হয়, যা ৫টি উইন্ডো সরবরাহ করে।
- দ্বিতীয় উইন্ডোতে একটি শেল প্রম্পট থাকে, যেখানে আপনি কমান্ড দিয়ে সিস্টেম পর্যবেক্ষণ ও সমস্যা নির্ণয় করতে পারেন।
- অন্য উইন্ডোগুলোতে লগ, ডায়াগনস্টিক মেসেজ এবং অন্যান্য তথ্য থাকে।
দ্বিতীয় কনসোল (Ctrl+Alt+F6):
এটি ডিফল্টভাবে দেখা যায় এবং এতে Anaconda-এর গ্রাফিক্যাল ইন্টারফেস থাকে।
Example:
ধরুন আপনি RHEL 8 ইনস্টল করছেন এবং ইনস্টলেশনের সময় সিস্টেম কোনো এক জায়গায় হ্যাং করে গেছে বা আপনি দেখতে চাচ্ছেন ভিতরে কী ঘটছে।
Step-by-Step উদাহরণ:
আপনি আছেন Anaconda Graphical Interface (ডিফল্ট), এই স্ক্রিনে।
- এখন আপনি Ctrl + Alt + F1 চাপলেন → এটা আপনাকে নিয়ে যাবে প্রথম virtual console-এ, যেখানে tmux চালু আছে।
- এখন আপনি Ctrl + b প্রেস করেলেন এবং ছেড়ে দিলেন → এরপর 2 প্রেস করলেন।
- এটা আপনাকে tmux-এর দ্বিতীয় উইন্ডোতে নিয়ে যাবে, যেখানে bash shell prompt আছে।
- সেখানে আপনি কমান্ড লিখলেন:
dmesg | less
আপনি কার্নেল লগ দেখতে পাচ্ছেন।
- আবার Ctrl + b → 1 প্রেস করলেন আপনি দেখতে পারবেন Anaconda log।
- আপনি Alt + Tab চাপ দিয়ে tmux উইন্ডোগুলোর মধ্যে ঘুরতে পারেন।
- সব দেখে নেওয়ার পর, আপনি আবার Ctrl + Alt + F6 প্রেস করলে ফিরে যাবেন মেইন গ্রাফিক্যাল ইনস্টলেশন ইন্টারফেসে।
- এইভাবে আপনি RHEL ইনস্টলেশনের সময় পেছনে কী ঘটছে (লগ, প্রব্লেম, নেটওয়ার্ক স্ট্যাটাস ইত্যাদি) দেখতে এবং troubleshoot করতে পারবেন — ইনস্টলেশন বন্ধ না করেই।
tmux ব্যবহারের শর্টকাট, কোনো tmux উইন্ডোতে যেতে চাইলে:
Ctrl+b চাপুন এবং ছেড়ে দিন → এরপর যে উইন্ডোতে যেতে চান তার নাম্বার কী চাপুন। উইন্ডোগুলোর মধ্যে switch করার জন্য: Alt+Tab ব্যবহার করতে পারেন।
Note:
- পূর্বের RHEL সংস্করণের সাথে সামঞ্জস্য রাখার জন্য: Red Hat Enterprise Linux-এর পুরোনো সংস্করণগুলোর সাথে মিল রেখে, Ctrl + Alt + F2 থেকে Ctrl + Alt + F5 পর্যন্ত যেসব ভার্চুয়াল কনসোল রয়েছে, সেগুলোতেও ইনস্টলেশনের সময় root shell প্রদান করা হয়।
- Tmux key sequence:
Ctrl+Alt+F1_ Access the tmux terminal multiplexer.
Ctrl+b 1_ main information page for the installation process.
Ctrl+b 2_ provides a root shell. Anaconda stores the installation log files in the /tmp file.
Ctrl+b 3_ display the contents of the /tmp/anaconda.log file.
Ctrl+b 4_display the contents of the /tmp/storage.log file.
Ctrl+b 5_display the contents of the /tmp/program.log file.
Ctrl+Alt+F6_ Access the Anaconda graphical interface.
Strawberry Group | Topic Two, Byte Part